All-Inclusive Hike-Themed Expedition Cruise around Tasmania
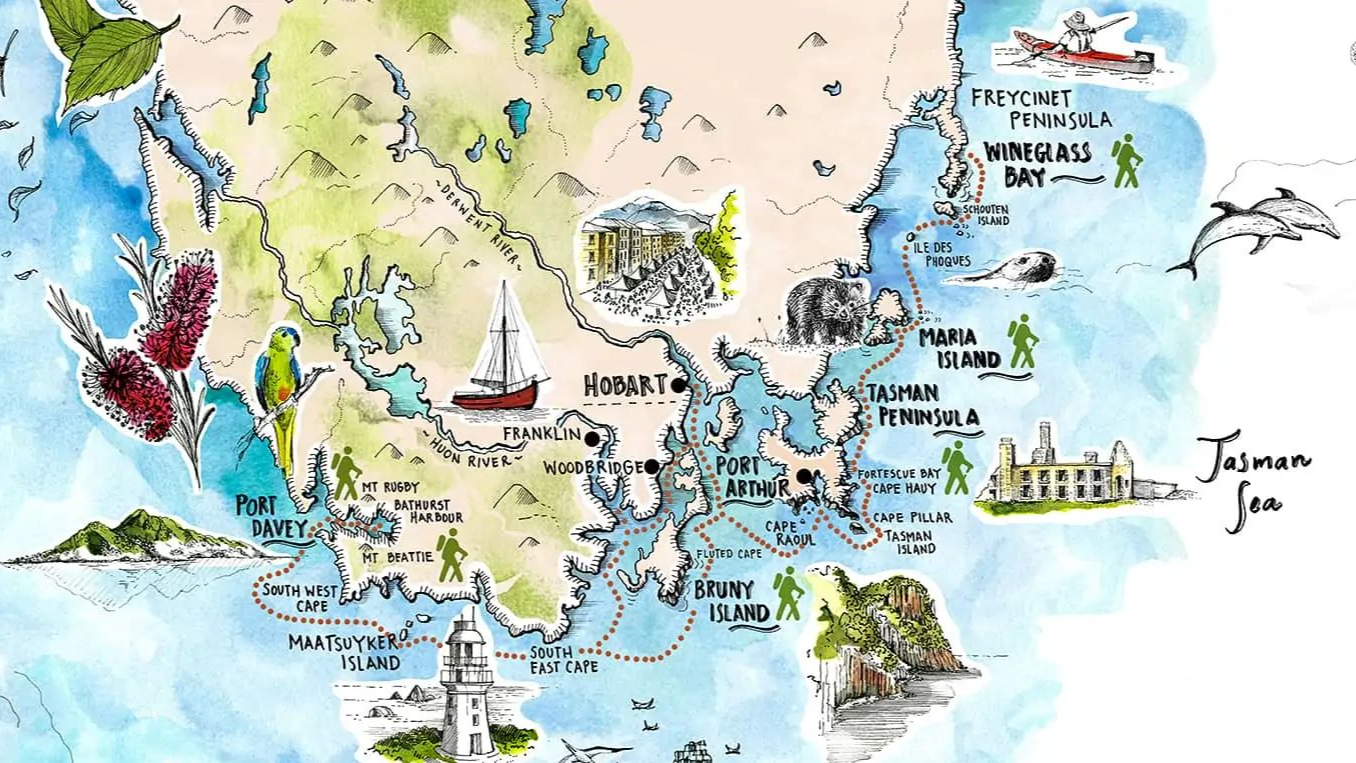
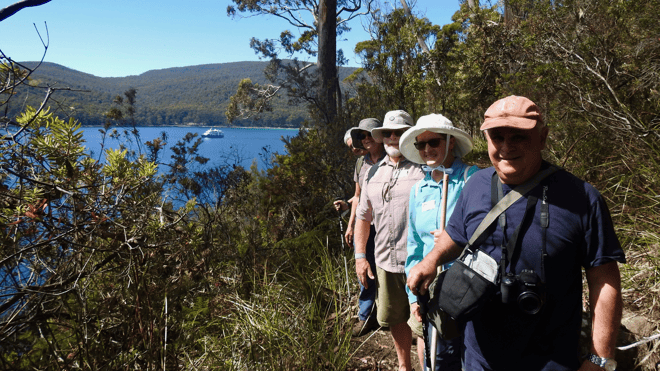
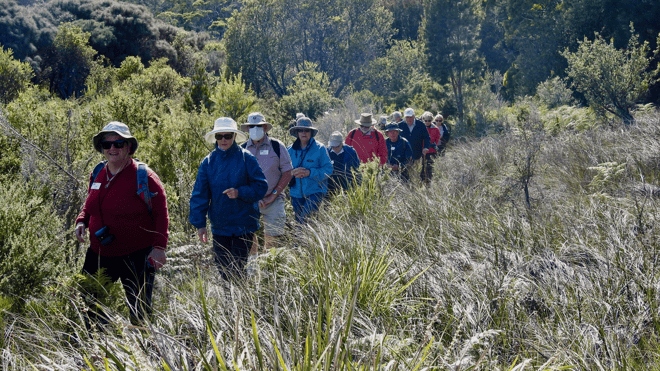
This 7-night hiking-themed itinerary takes you to explore the remote coastlines of Tasmania’s east and the iconic walks of the region. Guests will enjoy a variety of shore excursions, with both challenging and less strenuous walks on offer. The imposing cliffs, sandy beaches, and sapphire waters of the rugged coast of Tasmania offer an experience of spectacular beauty. Guided by experienced bush-walkers, explore breathtaking coastal hikes along with insights into the region’s unique ecosystem. Some of the longer/more challenging hikes include Mount Beattie, Mount Milner, Fluted Cape Walkway, Cape Hauy, Hazards Circuit, and Bishop and Clerk. After the day’s exertions, retire to Coral Discoverer’s panoramic Xplorer bar and recharge with a Tasmanian single malt or two.
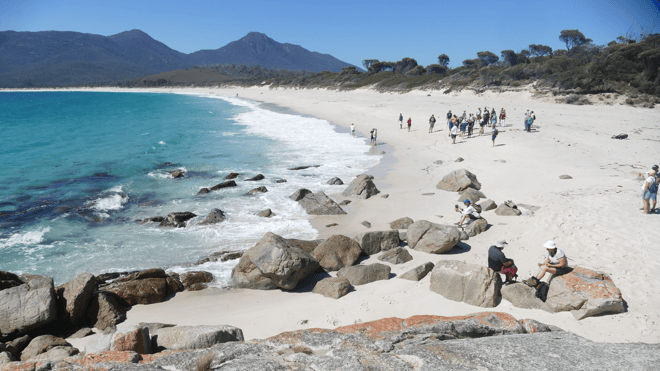
- Explore the beautiful Freycinet National Park: stroll the sweeping white sand of Wineglass Bay and hike to the lookout for a spectacular view, or explore further on the Hazards Circuit
- Visit the Noah’s Ark of Tasmania, and Maria Island, and spot wombats, wallabies, endemic birds, and other wildlife. Hike to the summit of Bishop and Clerk for spectacular views
- From the sea, have a breath-taking view of the 300-metre-high dolerite columns of the Tasman Peninsula, the highest sea cliffs in the southern hemisphere
- Walk a section of the famed Three Capes Track from Fortescue Bay to Cape Hay in Tasman National Park
*Access to Port Davey and Bathurst Harbour is subject to annual permits being granted by Tasmania Parks and Wildlife.
Your cruise includes:
- All excursions with our Expedition Team
- Use of Xplorer, Zodiacs, and Kayaks
- Daily lectures and briefings with Guest Lecturers
- All meals, chef-prepared on board
- Captain’s welcome and farewell events, and open bridge access
- Selected wines, selected beers and house spirits, juices, and soft drinks served with lunch and dinner
- 24-hour barista-style coffee and tea station
- All entrance fees to National Parks, ports, traditional owner fees and charges imposed by governing authorities
- Tips and gratuities
- Use of all onboard facilities, incl. a reference library
- Expedition diary, along with a photo and video gallery documenting the highlights of your voyage
- Post-cruise transfers
- Wifi Access – Standard speed connectivity enabling email, social image sharing, web browsing and messaging
Your fare excludes:
- Pre-cruise transfers
- Pre and post-cruise flights/charter flights
- Pre and post-cruise accommodation
- Travel Insurance
- Entry visas & travel permits for the country you are traveling to/from
- Alcoholic & non-alcoholic specialty beverages outside of lunch and dinner service
- Laundry service (available at a cost)
- Items of a personal nature such as souvenir purchases
- Optional Extras (in some destinations)
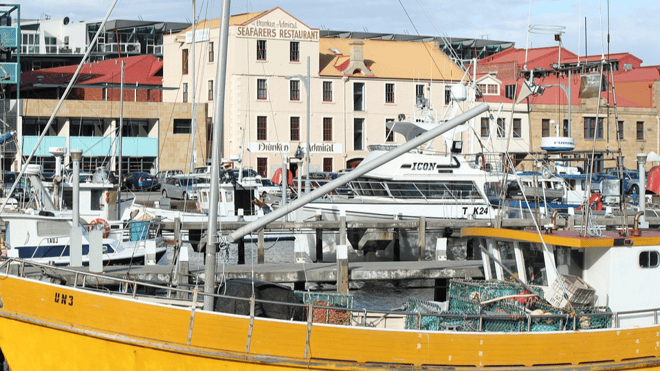
DAY 1: DEPART HOBART
Arrive at your advised check-in location for boarding at 4:00 pm, with time to settle into your stateroom before our 5:00 pm departure. Take the time to become acquainted with all the facilities onboard before meeting your fellow travelers, the Captain, and the crew for the Captain’s Welcome Drinks.
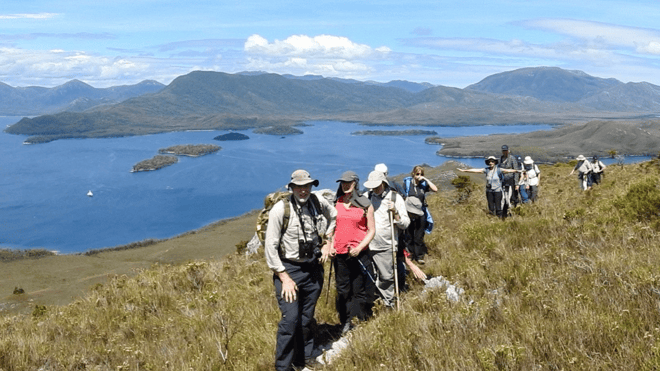
PORT DAVEY
On the edge of the world in southwest Tasmania, the landscape here is about as wild as it gets. Raw, craggy-peaked mountains and drowned river valleys. Wild rivers and rivulets carved by an eternity. Where tannin-rich freshwater sits atop saltwater, tinting the ocean the colour of tea. With no road access, the logical way to explore this wilderness is by a small expedition ship.
Guests will have the option of:
MOUNT BEATTIE
256m above sea level – The Mt Beattie track starts from a jetty at Claytons Corner where the historic. Claytons Hut is located, it travels steadily uphill through native forest then opens out to button grass, open windy areas which are often muddy on the trail to the summit. It offers stunning views of the whole Port Davey area in particular Bathurst Harbour.
Walk Details:
› Distance: 3 hours return
› Grade 3 walk – some bush-walking experience recommended. Tracks may have short steep hill sections, a rough surface, and many steps.
› Prepare with: A raincoat, woolen jumper or polar-fleece jacket, sturdy walking shoes or boots, and a sun hat.
MOUNT MILNER
180m above sea level – This hike begins with getting your feet wet in the shallow bay, the hike begins by slowly gaining height before reaching a short but very steep section which quickly gains height before leveling off and an easy up and down section to the lookout over the Break Sea Islands.
Walk Details:
› Distance: 2 hours return
› Grade 3 walk – some bush-walking experience recommended. Tracks may have short steep hill sections, a rough surface, and many steps.
› Prepare with: Sturdy walking shoes or boots, and a sun hat.
*Access to Port Davey and Bathurst Harbour is subject to annual permits being granted by Tasmania Parks and Wildlife.
BRUNY ISLAND
At Adventure Bay on the east coast of Bruny Island, we walk along the dramatic coastal cliffs of Fluted Cape and hope to see Bennett’s Wallabies which are endemic to Bruny Island. Learn about the rich maritime history of Adventure Bay, and explore the history of old whaling stations on the way to Grass Point.
FLUTED CAPE WALKWAY
240m above sea level – This is a moderately challenging track that has a very well-maintained loop track with several short steep sections, and gradual inclines. It begins at the beach and is a flat easy walk to a grassy point (1.5km) where the steep uphill section begins, it levels off at the lookout sections (1.5km) and then traverses down through the forest area, this can be slippery and muddy if rainfall has occurred.
Walk Details:
› 3 hours return loop (5.5km)
› Grade 3 walk – There is one very steep section on this track that requires good fitness but in general it is a steady climed to the summit lookout area before it is mostly downhill to the beach.
› Prepare with a water bottle, sturdy walking shoes or boots, and a sun hat.
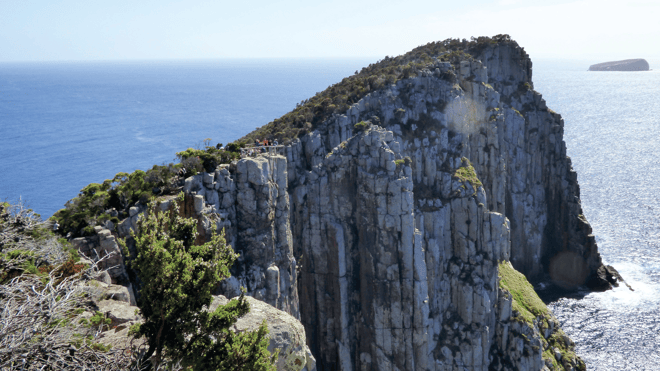
TASMAN NATIONAL PARK
The Tasman Peninsula is known for its fascinating geological formations like the Tessellated Pavement, Tasman Arch, and the soaring 300-meter-high dolerite sea cliffs of Cape Raoul, Cape Pillar, and Cape Hauy – the tallest in the southern hemisphere. We will visit Fortescue Bay, where guests will have the option of:
CAPE HAUY (part of the Three Capes Walk)
180m above sea level elevation gain – It features many steps along the way over 1000 on the way down and 800 to the junction lookout – good fitness and balance required. It starts from the boat ramp and undulates through woodlands and heath; it then drops down a steep set of steps before ascending to the Cape.
Walk Details:
› Distance: 4 hours return (4.4 km one way)
› Grade 3 walk – Some bush-walking experience is recommended. Tracks may have short steep hill sections, a rough surface, and many steps.
› Some hazardous cliffs and unprotected track edges
› Prepare with: A raincoat, woolen jumper or polar-fleece jacket, sturdy walking shoes or boots, and a sun hat.
CANOE BAY TO BIVOUAC BAY
Stroll along the shoreline looking for local wildlife as we beach-comb from Canoe to Bivouac Bay
FREYCINET NATIONAL PARK
The Freycinet Peninsula is a dramatic headland dominated by a pink-hued granite mountain range called the Hazards. Blessed with picturesque sweeping bays with white sand beaches like the famed Wineglass Bay, much of the peninsula is designated as Freycinet National Park.
Guests will have the option of:
HAZARD LOOP
204m elevation – From Wineglass Bay across the Isthmus track and walk down Hazards Beach before joining onto the Hazards track looping onto the start of the Wineglass Bay lookout walk from Coles Bay.
Walk Details:
› 3.5 – 4 hours return (12 km loop)
› Grade 3 walk – Undulates up and down a steady track then a rocky track with built-in steps. The walk over to Wineglass has many steps over 500 on the way down.
› Prepare with a water bottle, sturdy walking shoes or boots, and a sun hat.
ISTHMUS TRAIL
An easy flattish walk that undulates between Hazards Beach and Wineglass Bay on a well-formed trail can be walked either way. It features both sand and dirt tracks as well as a selection of boardwalks.
Walk Details:
› 30 minutes return (2 km)
› Grade 2 walk – There are some ups and downs bust mostly an easy enjoyable walk.
› Prepare with: a water bottle, sturdy walking shoes or boots, and a sun hat.
WINEGLASS BAY LOOKOUT
204m elevation – One of Tasmania’s celebrated walks, it is a very well-constructed walkway passing through the coastal woodland and striking granite boulders to the lookout. It is a steep uphill climb featuring many individual steps (more than 500) before reaching the lookout summit, as we cannot land on the Coles Bayside this is a return from Wineglass Bay.
Walk Details:
› 2 hours return (3 km) from Wineglass Bay
› Grade 3 walk – It is a steady and sometimes steep walk up featuring more than 500 steps integrated into the walkway.
› Prepare with: a water bottle, sturdy walking shoes or boots, and a sun hat.
MARIA ISLAND NATIONAL PARK
Maria Island can be referred to as a Noah’s Ark for native Tasmanian species. The Maria Island National Park provides an ideal sanctuary and is one of the best places in Australia to observe endemic birdlife as well as wombats, Cape Barren geese, Forester Kangaroos, Bennett’s Wallabies, and pademelons
Guests will have the option of:
BISHOP AND CLERK
620m above sea level, this hike climbs through grasslands, open forests, tall woodland, to rocky slopes towering dolomite columns of the summit. It involves steep up and down sections, and an extensive field of boulders with a short climb to the summit.
Walk Details
› 4-5 hours return
› Grade 4 walk – Bush-walking experience recommended. Tracks may be long, rough, and steep. Signage may be limited. Hazardous cliffs, unprotected track edges, rock screed scramble
› Prepare with: A raincoat, woolen jumper or polar-fleece jacket, sturdy walking shoes or boots, and a sun hat.
Other recommendations may include: Thermal pants, warm gloves, and a woolen beanie.
FOSSIL CLIFFS LOOP
54m elevation – This is a loop walk starting at the jetty and finishing at the Darlington Settlement. It follows gentle but uneven grass areas and well-maintained tracks it is mostly gentle ups and downs but does feature one steep hill climb. It visits the old buildings and the fossil cliffs where fossils were deposited some 300 million years ago.
Walk Details
› 2-2.5 hours loop return (4.5km)
› Grade 2 walk – Mostly on a well-maintained track. plenty of places to rest and features only one steep hill climb.
› Prepare with a water bottle, sturdy walking shoes or boots, and a sun hat.
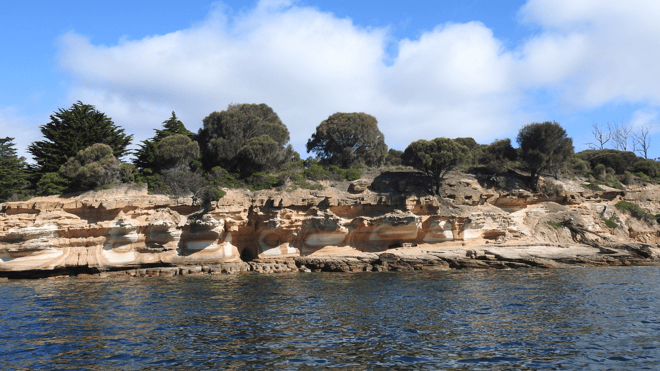
PAINTED CLIFFS
56m elevation – A relaxing loop return coastal walk that features the stunning painted cliffs at Hopground Beach, best done on a low tide to allow safe access to the rock platform beneath the cliffs.
Walk Details
› 2-2.5 hours loop return (4km)
› Grade 2 walk – It is mostly flat with only a gentle incline along the trail. The rock platform at the painted cliffs requires care as it can be slippery.
› Prepare with a water bottle, sturdy walking shoes or boots, and a sun hat.
DAY 8: ARRIVE HOBART
Our Tasmania adventure concludes in Hobart this morning as we bid farewell to new-found friends, the Master and crew, disembarking at 8:00 am. A complimentary transfer is provided to CBD hotels, or the airport is included.
(This itinerary is an indication of the destinations we visit and activities on offer. Throughout the expedition, we may make changes to the itinerary as necessary to maximize your expeditionary experience. Allowances may be made for seasonal variations, weather, tidal conditions, and any other event that may affect the operation of the vessel. Coral Expeditions suggests that you do not arrive on the day of embarkation or depart on the day of disembarkation due to any changes that may occur in scheduling. Note on fitness levels: This trip involves moderate to challenging walks, therefore reasonable mobility is required to enjoy all it has to offer. Our Xplorer tender permits easy boarding without climbing any stairs. Hikes vary in intensity and where possible we split groups to suit easy and moderate walkers. Guests are welcome to opt out of any excursion and relax onboard – our top-deck outdoor lounge is great on a sunny day. As the itinerary covers remote regions, it is not suitable for passengers with serious medical conditions.)
Please note prices are subject to availability at time of booking and may change without notice.
6 January 2026
- Main Deck (Category B) - from $6,230 per person twin share
- Main Deck (Category A) - from $6,860 per person twin share
- Promenade Deck (Category B) - from $7,490 per person twin share
- Promenade Deck (Category A) - from $8,120 per person twin share
- Bridge Deck Balcony Stateroom - from $8,610 per person twin share
Call our friendly team on 1300 414 198 to secure your cabin today! We can assist with all your travel needs.
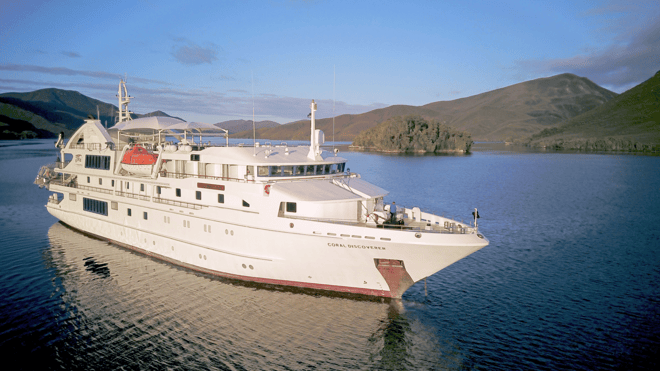

CORAL DISCOVERER
Launched in 2005, Coral Discoverer set a new benchmark standard for small ship cruising in Australia. Refurbished in November 2016, she continues to raise the bar to new levels of sophistication in expedition cruising. Coral Discoverer accommodates just 72 guests in 36 spacious staterooms.
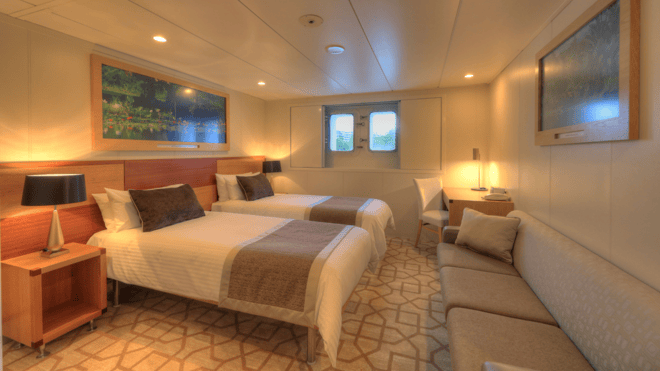
MAIN DECK (CATEGORY B) STATEROOM:
Located close to the Dining Room, our three spacious Main Deck (Category B) staterooms are 18sqm (195 square feet) in size and feature twin portholes for expansive ocean views, along with a desk, sofa, telephone and your choice of Junior King or twin bedding.
MAIN DECK (CATEGORY A) STATEROOM:
Located close to the Dining Room, our six spacious Main Deck (Category A) staterooms are 18sqm (195 square feet) in size and feature large, twin porthole windows for expansive ocean views, along with a desk, sofa, telephone and your choice of Junior King or twin bedding.
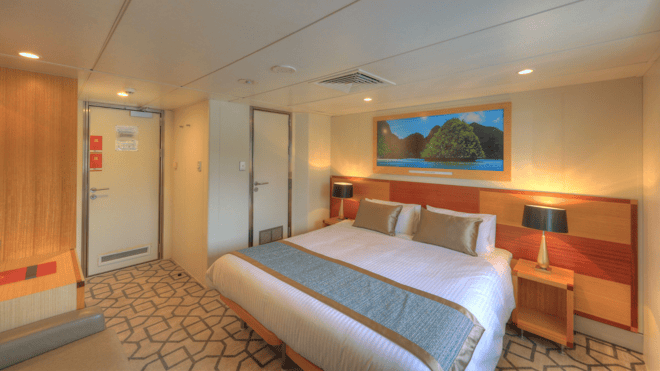
PROMENADE DECK (CATEGORY B) STATEROOM:
Located in the bow of the ship and encircled by a full-ship promenade, our two Promenade Deck (Category B) staterooms are 15sqm (160 square feet) in size and feature picture windows for expansive ocean views, along with a desk, telephone and Junior King bedding.
PROMENADE DECK (CATEGORY A) STATEROOM:
Encircled by a full-ship promenade, our 19 spacious Promenade Deck (Category A) staterooms are 18sqm (195 square feet) in size and feature picture windows for expansive ocean views, along with a sofa, desk, telephone and your choice of Junior King or twin bedding.
BRIDGE DECK BALCONY STATEROOM:
Located on the exclusive Bridge Deck close to the Lounge and Bridge, our six spacious Bridge Deck staterooms are 20sqm (215 square feet) in size and open out onto private balconies for expansive ocean views, along with a sofa, desk, telephone and your choice of Junior King or twin bedding.
Note on fitness levels: This trip involves moderate to challenging walks, therefore reasonable mobility is required to enjoy all it has to offer. Our Xplorer tender permits easy boarding without climbing any stairs. Hikes vary in intensity and where possible we split groups to suit easy and moderate walkers. Guests are welcome to opt out of any excursion and relax onboard – our top deck outdoor lounge is great on a sunny day. As the itinerary covers remote regions, it is not suitable for passengers with serious medical conditions.
Travel at 60 and supplier booking conditions apply.
All guests must comply with our SailSAFE Plan. The key elements of this plan are:
- Vaccination & Health Details: Submit this information to Coral Expedition with your booking number and surname.
- Self-Isolation and Safe Travel in the 7 days prior to the voyage including the avoidance of public gatherings, mask-wearing, physical distancing and regular hand sanitization.
- Rapid Antigen Test: A RAT must be completed within 24 hours of voyage departure and self-reported with a photo result submitted through our dashboard.
- Check-In: Guests must arrive at the designated venue for check-in and clearance prior to embarkation, where they will undertake a further Rapid Antigen Test overseen by our team. Coral Expeditions will provide the test kits.